I have been experimenting with the installation of Ubuntu Server onto a HP BL35P blade server and the process has been quite a learning experience indeed. The need to use the HP SmartStart CD to erase the RAID array on the server before the installation is different from your run of the mill desktop machine that can be easily erased with the Ubuntu partitioning tools or Windows disk management. A blade server is a different beast; requiring more attention to detail. Using the Integrated Lights-Out to manage the server remotely is just like using any remote desktop product; although you have a lot of control over the rack mounted server. You can turn the light on the front on and off, this is useful to make sure of which machine you are connected to. And you may also check fan speeds and temperatures for the hardware at a glance by clicking the appropriate tab in the ILO page. Here is a nice Youtube video that explains the ILO system in detail for administering a rack mounted server: http://www.youtube.com/watch?v=W_IVihv64jk.
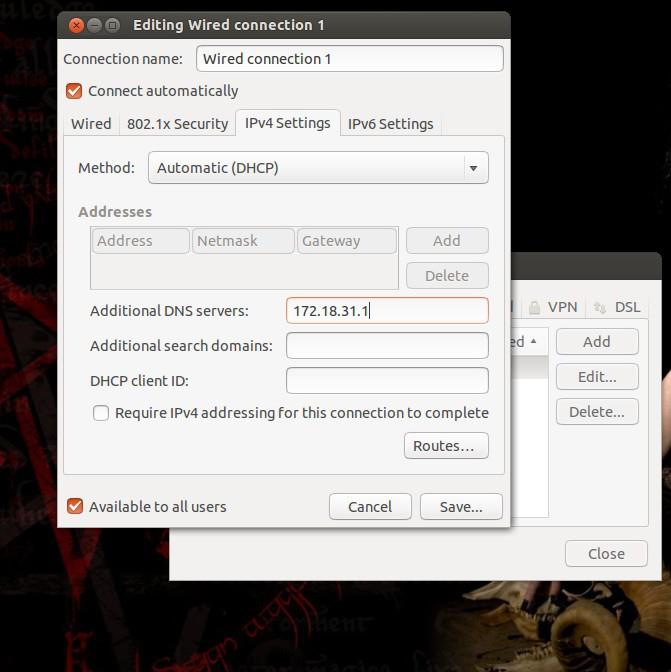
After watching this video you will have a good understanding of the functioning of the Integrated Lights-Out system for administering a Hewlett Packard rack server in a standard rack mount. Ubuntu Server would be a very good distribution to run on a rack mounted server; surely it will be able to install to a RAID array and be administered remotely with ILO. The SSH protocol for remotely connecting to a Linux machine and executing commands will be used once we get around to the installation. We had a lot of trouble getting the older firmware to work, it was version 1.85 and we updated it to version 9.30! But we ended up attaching a USB CD/DVD drive to the rack server using the expensive cable and then ran the HP SmartStart CD from a workstation over the network using ILO. Still; when I had some free time I loaded Ubuntu on a free machine on the network and added the IP address of the DNS server that manages the network and I got the machine to connect to the proxy server so I could access the Internet.
As shown in the screenshot to the left, this is an easy process. After this I added the proxy settings to the /etc/apt/apt.conf file as shown in the code sample below. This allows you to install packages with apt through the network. This is better than other methods. Just put a hash character at the start of the line to comment it out when you are away from the proxied network.
Acquire::http::proxy "http://Username:[email protected]:8080/"; |
That way we are still using the installation remotely, it is just running on a drive attached to the server. That is how flexible the HP server software is. The Ubuntu installation should be a piece of cake. Linux installed on a rack server is a perfect solution for deploying content. We could install the LAMP server role and serve out a simple website. That is one of the many things that Linux can do for you when it is installed onto a proper piece of server hardware. And the remote management is very useful when you do not want to sit next to a server rack in a noisy and cold server room. Remote management is where it`s at. The Windows Server 2008 R2 desktop does not refresh very quickly when accessing it via ILO; but any remote desktop setup is a heap of fun. Especially the ILO system as you can re-boot a server remotely and then re-connect to do further administration. I am setting up my Linux machine so that I can access it remotely, I will be using SSH to do this with Putty, this will be very useful for entering notes with VI and saving them directly to my home computer.
I have the /etc/hosts.allow file setup like this:
|{~/Documents}-{Tue Mar 19 20:36:26} -{john@adeptus-mechanicus } $ cat /etc/hosts.allow # /etc/hosts.allow: list of hosts that are allowed to access the system. # See the manual pages hosts_access(5) and hosts_options(5). # # Example: ALL: LOCAL @some_netgroup # ALL: .foobar.edu EXCEPT terminalserver.foobar.edu # # If you're going to protect the portmapper use the name "portmap" for the # daemon name. Remember that you can only use the keyword "ALL" and IP # addresses (NOT host or domain names) for the portmapper, as well as for # rpc.mountd (the NFS mount daemon). See portmap(8) and rpc.mountd(8) # for further information. sshd:ALL |
And the /etc/hosts.deny file contains this line:
|{~/Documents}-{Tue Mar 19 20:43:01} -{john@adeptus-mechanicus } $ cat /etc/hosts.deny # /etc/hosts.deny: list of hosts that are _not_ allowed to access the system. # See the manual pages hosts_access(5) and hosts_options(5). # # Example: ALL: some.host.name, .some.domain # ALL EXCEPT in.fingerd: other.host.name, .other.domain # # If you're going to protect the portmapper use the name "portmap" for the # daemon name. Remember that you can only use the keyword "ALL" and IP # addresses (NOT host or domain names) for the portmapper, as well as for # rpc.mountd (the NFS mount daemon). See portmap(8) and rpc.mountd(8) # for further information. # # The PARANOID wildcard matches any host whose name does not match its # address. # # You may wish to enable this to ensure any programs that don't # validate looked up hostnames still leave understandable logs. In past # versions of Debian this has been the default. ALL:ALL |
This way, the SSH connections can go through, but other connections will be verboten.